Once you start working on a 2D game, the question of how to set up a proper render order will come up very early on. Render order, at least in the way I will be using the term, determines which parts of your 2D game get rendered (drawn, displayed, shown) in front of (i.e. later than) other parts.
Unfortunately, you won't be able to figure out the requirements for a good system until after you need it. I just spent almost a week changing ours from what I thought would be good when we started our current project to what many months later turned out to make a lot more sense. Here's hoping that our findings will save you the trouble of going through that painful refactoring process and help you get it right from the start.
Please note:
- Some of this makes sense for any 2D game, but some will be specific to a perfect side view typical for side-scrolling games.
- This system accounts for real-time lighting; if that's no concern of yours, a simpler system might do.
- It also accounts for multiple vertical layers, some of which are only revealed after a foreground sprite fades out. If your game doesn't have this, parts of our system will be irrelevant for you.
- I will be using some Unity-specific terminology like "Sorting Layer" and "Order in Layer". Nevertheless, most of this article should be helpful on a conceptual level regardless of game engine.
1. Quick introduction: Render Order Terminology (in Unity)
In case you're working in Unity and are completely new to the topic, I thought I'd provide a short explanation of Unity's Render Order system (as of Unity 2019.3.13) and give you a quick intro into its usage. If you already know it, skip right ahead to Best Practices below.
The following assumes that you actually work in a 2-dimensional space and aren't using the Z axis to determine Render Order. If you want your sprites to use Unity's 2D Render Order system instead of rendering based on your sprites' Z positions, you need to select your camera and set its Projection to Orthographic instead of Perspective.
1.1 Sorting Layers
Once that is done, all your sprites will be rendered based on Sorting Layers ("SL" for short). These work essentially like layers in Photoshop or any other image editing software: All sprites on one SL will always be rendered in front of all sprites on another, thus adding depth on an "imagined Z axis".
Let's have a look at the available Sorting Layers. Add a SpriteRenderer component to a game object and select the Sorting Layer drop-down.

Hit Add Sorting Layer... at the bottom to open the Tags and Layers window. It shows all existing SLs and allows you to add any number of new ones. "Default" cannot be deleted, but you don't have to use it. The SL at the top of the list is rendered at the very back, the SL at the bottom is all the way in the front.
Most of the advice under Best Practices pertains to which layers you should set up, so I won't go into detail about it here. However, here's a Unity-specific tip: When adding new SLs, use a slash to nest them. Nested layers will then appear neatly grouped together in the SL drop-down on your Sprite Renderers. In the example below, we distinguish between middleground (MG) and background (BG), each of which encompass several SLs:

Once your SLs are set up, you can assign any sprite in your scene to them by selecting its SpriteRenderer component and picking the desired SL from the drop-down menu.
1.2 Order in Layer
Within each SL, sprites are again organized into an Order in Layer ("OiL" for short). While SLs have names, the OiL of a sprite is indicated as an integer. The higher it is, the further in front a sprite is rendered. Consider the following example containing three SLs: "Background", "Middleground", and "Foreground".
| Sprite | Sorting Layer | Order in Layer |
|---|---|---|
| Sky | Background | -1 |
| Moon | Background | 0 |
| Skyline | Background | 1 |
| House | Middleground | -1 |
| Player character | Middleground | 0 |
| Column | Middleground | 1 |
| Laundry | Foreground | 0 |

Even though sky, moon, and skyline are all on the background layer, they are rendered in the correct order because of their Order in Layer. As you can see, an OiL can have a negative int value.
2. Best Practices
At this point, you might think that you know all you need to render your sprites in the right order. If you're going for a more simple look, that might be the case. However, if you want to go the extra mile (especially if you have dynamic lighting), here are some more specific tips for setting up Sorting Layers (SLs) and Orders in Layer (OiL) in a future-proof way. And even though the terminology comes from Unity, much of the following advice should apply to any engine on a conceptual level.
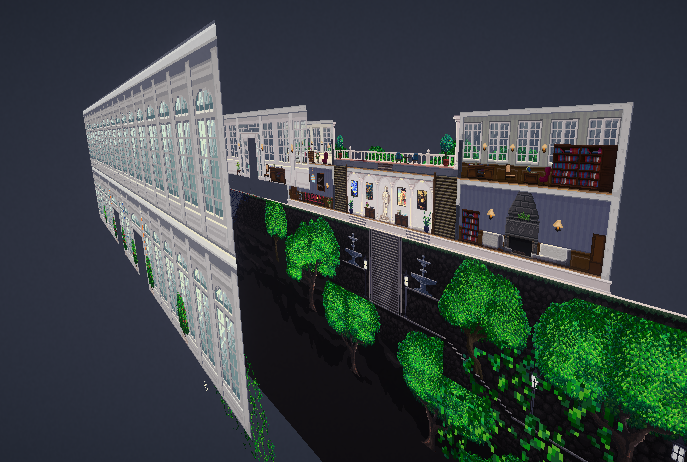
2.1 Background and Foreground
For our project, we have decided to distinguish between background (BG), middleground (MG), and foreground (FG). This is merely a conceptual distinction; on a technical level, each of these is made up of multiple Sorting Layers. We also added a Sorting Layer named "Dev" for sprites that we use for development only that's invisible to the player. Something we didn't do (but might in the future) is add another visible layer for all World Space UI to ensure that it renders in front of all non-UI sprites.

No matter how you end up doing it, one thing to keep in mind when setting up SLs is lighting. Each 2D Light component in Unity can be set to affect or not affect any number of Sorting Layers:

This means that the system determining render order and the system determining which lights affect which sprites are intertwined. This may cause problems; for example, let's go back to the example shown under Sorting Order above: If you add a light to brighten the moon, it will inevitably (within its range) also brighten the sky and skyline because all three of them are on the same Sorting Layer. You might not want one light in the background to affect another background layer that seems very far away from it (on the imagined Z axis). Luckily, this can easily be resolved by making the system more granular, i.e. by adding more Sorting Layers. The moon and sky could remain on the same SL and the skyline could be put on a new one that's visually closer to the player. This way, the moon would light up the clouds, but not the skyline.
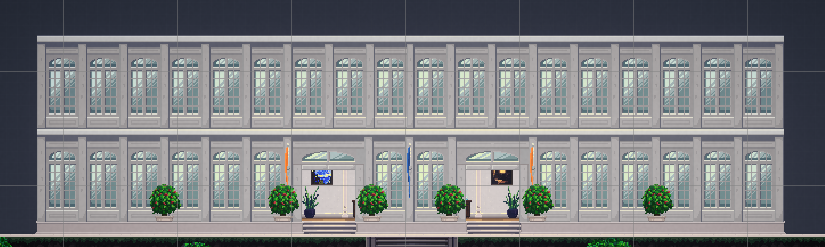
For our game, we created 7 Sorting Layers for the background alone. We ended up with that number specifically after experimenting and deciding that 7 visually distinct layers looked alright. You'll notice that some background layers contain a big, semi-transparent sprite that adds atmospheric tint:

Incidentally, we got another usage out of those 7 background layers by giving each one its own parallax speed. (Creating a parallax effect without the need for a Z axis is a topic for another day.)

Some of those SLs may be further subdivided into Orders in Layer. For example, this street in the background is made up of three parts in itself: handrail in front, NPCs in the middle, and the rest in the back.

We also added a "negative parallax" layer to the very foreground that moves in opposition to the camera and the parallax layers in the background:

The middleground is where it gets complicated, so let's give it a closer look!
2.2 Middleground
The middleground (at least in our terminology) is where all the action takes place, where the player and NPCs live, and as a result, where things move around a lot. I'll first explain how we set it up and then elaborate on the reasoning behind it.

2.2.1 Sorting Layers
This next distinction might appear arbitrary at first, but it is in fact the ideal result we arrived at after a long series of experimentation: There are generally two types of Sorting Layers in the middleground; "movement layers" where the player and NPCs move around (called MG/middle and MG/back), and "wall layers" separating them (called MG/frontwall, MG/middlewall, and MG/backwall). Think of this latter type as the "walls" sandwiching the middle and back SLs between each other (even though they contain many sprites not specifically depicting walls).
The player and NPCs can only move on MG/middle and MG/back and sometimes switch from one to the other. Differently put, they can be in "middle areas" (where they are rendered on MG/Middle) and "back areas" (where they are rendered on MG/back). The distinction between these two isn't always immediately apparent and may seem open for interpretation. When does the player transition from middle to back? The quick answer is: Whenever they "pass by" a layer of sprites (specifically MG/middlewall) that rendered behind them before and now renders in front of them, i.e. when they walk past a wall layer.
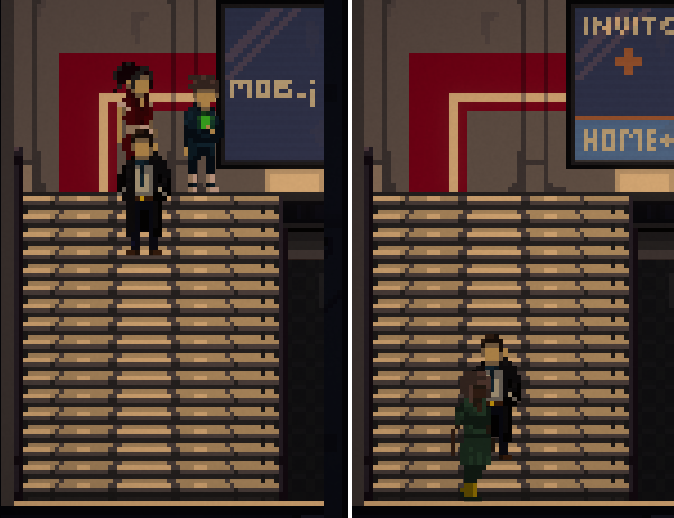
By doing so, the player may enter the bounds of a sprite on the wall layer inbetween that then fades out. We call these "facades", and one can be seen in the first example below.
Moving up: Buildings and areas entered via frontal stairs from below are usually considered as the player entering a back area because the player walks "further into" the screen or "away from the player", behind the wall layer they were previously in front of:

However, this isn't necessarily the case when moving up. In the example below, the player stays on MG/middle the whole time. That is because they never pass by a wall layer; the facade sprite that fades out was in front of them the whole time (on MG/frontwall), as you can see from the columns at the bottom:

Other movements: Entering a building or area from the side or top is different as the player never goes "further into" the screen, thus never bypassing a wall layer, no matter if they walk normally, use stairs, or walk through a door. This case never counts as entering or leaving a back area because no movement on the imagined Z axis occurs.

Teleporting: Teleporters moving the player from an open area into a room or building aren't all the same. If the player is transported behind a sprite that was previously behind the player (again: if they move past MG/middlewall), they are indeed moving from MG_middle to MG_back:

However, if the player does not move past a sprite that was previously behind them, they stay on the same layer. In the example below, the player teleports from MG_middle to MG_middle.

2.2.1.1 What to look out for
After telling you what worked, I also want to talk about the mistake we made with our Sorting Layers that caused me to rebuild the system completely to the way it is now. I urge you to read this bit as it might save you a lot of headache!
The render order we used to have included only the Sorting Layers MG/front/middle/back/veryback. However, this fell apart with the introduction of 2D Lights: In certain scenarios, a sprite needed to be rendered on a certain layer but wasn't supposed to be affected by a light source that applied to other sprites on that same layer. This mostly affected facades; consider the example below:
The player needs to be rendered in front of the facade while outside the building. Therefore, since the player is on the (formerly) MG_middle layer, the facade needs to be on the same or a lower middleground layer to be rendered behind the player; it cannot be on MG/front.

However, light sources inside the building apply to (formerly) MG/middle as well as (formerly) MG/back to light up the correct sprites on the inside, behind the facade. As a result, lights rendered behind the facade appear to fall on the front of the facade, which shouldn't be the case.
That's why the facade has to be on another layer between the player and the regular MG_middle layer, which is only affected by lights in front of it. To allow for this, we needed to add more layers.
Unfortunately, simply adding more layers only half-solved the problem because sprites like the player and NPCs may switch from middle to back and vice versa. As a result, any light on one of those layers will either not affect those moving sprites or always affect them, including in the wrong scenarios (i.e. through walls). That is why we came up with the distinction between middle areas and back areas as well as the wall layers between them. Moving from one to the other changes the moving sprite's Render Layer to MG/middle and MG/back respectively (simply based on entering trigger colliders). As a result, a light source affects them when they're right next to it in the same room – but not when they're right next to it but with a wall-inbetween.
2.2.2 Order in Layer
Similarly to the background, each Sorting Layer in the middleground is in itself divided into multiple Orders in Layer (OiL). Here's what we learned about using those.
2.2.2.1 Keep OiL the same across SLs
The "wall layers" are each structured very similarly to one another, meaning that one wall layer's OiL values are (almost) exactly the same as all the other wall layers' OiL values. The two movement layers also share the same OiL values. This makes memorizing OiL much easier and considerably speeds up placing sprites in the scene. For example, one type of sprite (e.g. foliage) has the same OiL across all wall layers on which it occurs. Make sure to set up external documentation for these general OiL rules (and your Render Order in general)!
2.2.2.2 Reserve OiL
In our project, some of the sprites can be interacted with (we call these "Interactables") and show outlines once the player gets in range. The outlines need to be rendered behind the Interactable, but in front of the sprite behind it. This means that one OiL between the Interactable and the sprite right behind it needs to be reserved for the outline to prevent "fighting" for render order between the outline and the background sprite. For instance, if an Interactable (e.g. a cigarette vending machine) is on OiL 1 and the sprite behind it (e.g. a wall) is on OiL 0, the outline of the Interactable would have nowhere to go in-between the two. That's why we have now reserved certain OiL for certain renderers: The OiL of any sprite must always be set to a multiple of ten (i.e. end in 0); outlines always render 1 OiL behind the sprite they belong to (i.e. end in 9). In our example, the cigarette vending machine could be on 10, the wall behind it on 0, and the vending machine outline on 9. Particle effects also often overlap with multiple sprites in uncontrolled ways, so we always place them on an OiL ending in 8 to avoid "fights". Layers ending in 2 to 7 are still free for future special usage if the need arises.
2.2.2.3 Dynamic OiL
Most moving sprites in our game, like characters, update their Order in Layer every frame depending on their y position. This has to happen in order for them to render in the correct order relative to one another (on the same SL) where movement on the Y axis occurs, e.g. on stairs. In the example below, the player character renders in front of the NPCs above it, but behind the NPCs below it.
Simply binding the OiL to an object's y position – the further up it is on the screen, the lower its OiL – might be enough depending on your setup. However, you'll likely run into a couple of problems:
Problem 1: This might not work for special situations, e.g. complex set piece animations with lots of moving parts.
Solution: That is why we recommend adding a boolean so you can turn this functionality off if you ever desire to set the Order in Layer manually instead.
Problem 2: What about the rule that sprites can only be rendered on OiL that end in 0?
Solution: To ensure that this is the case for moving sprites as well, just multiply the OiL by 10. (Concrete formula below.)
Problem 3: Calculating the render order of sprites based on their relative position only works for sprites that rest on the floor.
Solution: If your sprites can jump, float, or fly, things get a bit trickier. The short answer is: take the distance between a sprite and the ground platform it relates to into account when calculating the sprite's OiL. This wasn't a problem for us because we have no jumping mechanics, so I won't go into more detail about it. However, this great blog post does!
Finally, here's our complete OiL calculation formula (located in the Update() method) followed by a quick explanation:
movingSprite.sortingOrder = -1 * (Mathf.RoundToInt(transform.position.y * 100f) * 10);
| Element | Reasoning |
|---|---|
| movingSprite.sortingOrder | The sprite's Order in Layer value. |
| -1 | Sprites higher up are actually further in the back, i.e. the higher the y value, the lower we want the OiL to be. |
| Mathf.RoundToInt() | The OiL needs to be an integer. Use rounding rather than casting to int, which only chops off the decimals. |
| transform.position.y * 100 | Take the sprite's y position down to the second position after the decimal point before rounding. (bigger order of magnitude = more precise) |
| * 10 | Make sure the sprite's OiL always ends in 0 as established above. |
This is what it looks like in the game. Note that the OiL at the top changes as the player moves up and down.

And that's how we do it!
I'll talk more about properly setting up 2D assets, e.g. creating a parallax effect and how to handle pixel art, in future blog posts. If you found an error in this post or see room for improvement, I'll be happy to update it. And if you found it useful, feel free to share it!
Cheers,
Julian