Category: Tutorial

  • Future-Proof 2D Render Order

    Future-Proof 2D Render Order

    Once you start working on a 2D game, the question of how to set up a proper render order will come up very early on. Render order, at least in the way I will be using the term, determines which parts of your 2D game get rendered (drawn, displayed, shown) in front of (i.e. later than) other parts.

    Unfortunately, you won’t be able to figure out the requirements for a good system until after you need it. I just spent almost a week changing ours from what I thought would be good when we started our current project to what many months later turned out to make a lot more sense. Here’s hoping that our findings will save you the trouble of going through that painful refactoring process and help you get it right from the start.

    Please note:

    1. Some of this makes sense for any 2D game, but some will be specific to a perfect side view typical for side-scrolling games.
    2. This system accounts for real-time lighting; if that’s no concern of yours, a simpler system might do.
    3. It also accounts for multiple vertical layers, some of which are only revealed after a foreground sprite fades out. If your game doesn’t have this, parts of our system will be irrelevant for you.
    4. I will be using some Unity-specific terminology like “Sorting Layer” and “Order in Layer”. Nevertheless, most of this article should be helpful on a conceptual level regardless of game engine.

    1. Quick introduction: Render Order Terminology (in Unity)

    In case you’re working in Unity and are completely new to the topic, I thought I’d provide a short explanation of Unity’s Render Order system (as of Unity 2019.3.13) and give you a quick intro into its usage. If you already know it, skip right ahead to Best Practices below.

    The following assumes that you actually work in a 2-dimensional space and aren’t using the Z axis to determine Render Order. If you want your sprites to use Unity’s 2D Render Order system instead of rendering based on your sprites’ Z positions, you need to select your camera and set its Projection to Orthographic instead of Perspective.

    1.1 Sorting Layers

    Once that is done, all your sprites will be rendered based on Sorting Layers (“SL” for short). These work essentially like layers in Photoshop or any other image editing software: All sprites on one SL will always be rendered in front of all sprites on another, thus adding depth on an “imagined Z axis”.

    Let’s have a look at the available Sorting Layers. Add a SpriteRenderer component to a game object and select the Sorting Layer drop-down.

    Hit Add Sorting Layer… at the bottom to open the Tags and Layers window. It shows all existing SLs and allows you to add any number of new ones. “Default” cannot be deleted, but you don’t have to use it. The SL at the top of the list is rendered at the very back, the SL at the bottom is all the way in the front.

    Most of the advice under Best Practices pertains to which layers you should set up, so I won’t go into detail about it here. However, here’s a Unity-specific tip: When adding new SLs, use a slash to nest them. Nested layers will then appear neatly grouped together in the SL drop-down on your Sprite Renderers. In the example below, we distinguish between middleground (MG) and background (BG), each of which encompass several SLs:

    Once your SLs are set up, you can assign any sprite in your scene to them by selecting its SpriteRenderer component and picking the desired SL from the drop-down menu.

    1.2 Order in Layer

    Within each SL, sprites are again organized into an Order in Layer (“OiL” for short). While SLs have names, the OiL of a sprite is indicated as an integer. The higher it is, the further in front a sprite is rendered. Consider the following example containing three SLs: “Background”, “Middleground”, and “Foreground”.

    SpriteSorting LayerOrder in Layer
    SkyBackground-1
    MoonBackground0
    SkylineBackground1
    HouseMiddleground-1
    Player characterMiddleground0
    ColumnMiddleground1
    LaundryForeground0

    Even though sky, moon, and skyline are all on the background layer, they are rendered in the correct order because of their Order in Layer. As you can see, an OiL can have a negative int value.

    2. Best Practices

    At this point, you might think that you know all you need to render your sprites in the right order. If you’re going for a more simple look, that might be the case. However, if you want to go the extra mile (especially if you have dynamic lighting), here are some more specific tips for setting up Sorting Layers (SLs) and Orders in Layer (OiL) in a future-proof way. And even though the terminology comes from Unity, much of the following advice should apply to any engine on a conceptual level.

    2.1 Background and Foreground

    For our project, we have decided to distinguish between background (BG), middleground (MG), and foreground (FG). This is merely a conceptual distinction; on a technical level, each of these is made up of multiple Sorting Layers. We also added a Sorting Layer named “Dev” for sprites that we use for development only that’s invisible to the player. Something we didn’t do (but might in the future) is add another visible layer for all World Space UI to ensure that it renders in front of all non-UI sprites.

    Hiding and showing the three main groups of Sorting Layers (BG, MG, and FG) using a custom script

    No matter how you end up doing it, one thing to keep in mind when setting up SLs is lighting. Each 2D Light component in Unity can be set to affect or not affect any number of Sorting Layers:

    This means that the system determining render order and the system determining which lights affect which sprites are intertwined. This may cause problems; for example, let’s go back to the example shown under Sorting Order above: If you add a light to brighten the moon, it will inevitably (within its range) also brighten the sky and skyline because all three of them are on the same Sorting Layer. You might not want one light in the background to affect another background layer that seems very far away from it (on the imagined Z axis). Luckily, this can easily be resolved by making the system more granular, i.e. by adding more Sorting Layers. The moon and sky could remain on the same SL and the skyline could be put on a new one that’s visually closer to the player. This way, the moon would light up the clouds, but not the skyline.

    For our game, we created 7 Sorting Layers for the background alone. We ended up with that number specifically after experimenting and deciding that 7 visually distinct layers looked alright. You’ll notice that some background layers contain a big, semi-transparent sprite that adds atmospheric tint:

    Incidentally, we got another usage out of those 7 background layers by giving each one its own parallax speed. (Creating a parallax effect without the need for a Z axis is a topic for another day.)

    Some of those SLs may be further subdivided into Orders in Layer. For example, this street in the background is made up of three parts in itself: handrail in front, NPCs in the middle, and the rest in the back.

    We also added a “negative parallax” layer to the very foreground that moves in opposition to the camera and the parallax layers in the background:

    The middleground is where it gets complicated, so let’s give it a closer look!

    2.2 Middleground

    The middleground (at least in our terminology) is where all the action takes place, where the player and NPCs live, and as a result, where things move around a lot. I’ll first explain how we set it up and then elaborate on the reasoning behind it.

    2.2.1 Sorting Layers

    This next distinction might appear arbitrary at first, but it is in fact the ideal result we arrived at after a long series of experimentation: There are generally two types of Sorting Layers in the middleground; “movement layers” where the player and NPCs move around (called MG/middle and MG/back), and “wall layers” separating them (called MG/frontwallMG/middlewall, and MG/backwall). Think of this latter type as the “walls” sandwiching the middle and back SLs between each other (even though they contain many sprites not specifically depicting walls).

    The player and NPCs can only move on MG/middle and MG/back and sometimes switch from one to the other. Differently put, they can be in “middle areas” (where they are rendered on MG/Middle) and “back areas” (where they are rendered on MG/back). The distinction between these two isn’t always immediately apparent and may seem open for interpretation. When does the player transition from middle to back? The quick answer is: Whenever they “pass by” a layer of sprites (specifically MG/middlewall) that rendered behind them before and now renders in front of them, i.e. when they walk past a wall layer.

    By doing so, the player may enter the bounds of a sprite on the wall layer inbetween that then fades out. We call these “facades”, and one can be seen in the first example below.

    Moving up: Buildings and areas entered via frontal stairs from below are usually considered as the player entering a back area because the player walks “further into” the screen or “away from the player”, behind the wall layer they were previously in front of:

    However, this isn’t necessarily the case when moving up. In the example below, the player stays on MG/middle the whole time. That is because they never pass by a wall layer; the facade sprite that fades out was in front of them the whole time (on MG/frontwall), as you can see from the columns at the bottom:

    Other movements: Entering a building or area from the side or top is different as the player never goes “further into” the screen, thus never bypassing a wall layer, no matter if they walk normally, use stairs, or walk through a door. This case never counts as entering or leaving a back area because no movement on the imagined Z axis occurs.

    Teleporting: Teleporters moving the player from an open area into a room or building aren’t all the same. If the player is transported behind a sprite that was previously behind the player (again: if they move past MG/middlewall), they are indeed moving from MG_middle to MG_back:

    However, if the player does not move past a sprite that was previously behind them, they stay on the same layer. In the example below, the player teleports from MG_middle to MG_middle.

    2.2.1.1 What to look out for

    After telling you what worked, I also want to talk about the mistake we made with our Sorting Layers that caused me to rebuild the system completely to the way it is now. I urge you to read this bit as it might save you a lot of headache!

    The render order we used to have included only the Sorting Layers MG/front/middle/back/veryback. However, this fell apart with the introduction of 2D Lights: In certain scenarios, a sprite needed to be rendered on a certain layer but wasn’t supposed to be affected by a light source that applied to other sprites on that same layer. This mostly affected facades; consider the example below:

    Example setup; sprites have been moved on the Z axis only for demonstration purposes

    The player needs to be rendered in front of the facade while outside the building. Therefore, since the player is on the (formerly) MG_middle layer, the facade needs to be on the same or a lower middleground layer to be rendered behind the player; it cannot be on MG/front.
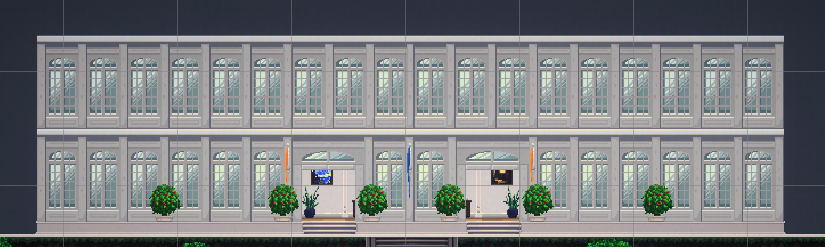
    Example: outside (MG_middlewall)

    Example: inside (MG_backwall)

    However, light sources inside the building apply to (formerly) MG/middle as well as (formerly) MG/back to light up the correct sprites on the inside, behind the facade. As a result, lights rendered behind the facade appear to fall on the front of the facade, which shouldn’t be the case.

    That’s why the facade has to be on another layer between the player and the regular MG_middle layer, which is only affected by lights in front of it. To allow for this, we needed to add more layers.

    Unfortunately, simply adding more layers only half-solved the problem because sprites like the player and NPCs may switch from middle to back and vice versa. As a result, any light on one of those layers will either not affect those moving sprites or always affect them, including in the wrong scenarios (i.e. through walls). That is why we came up with the distinction between middle areas and back areas as well as the wall layers between them. Moving from one to the other changes the moving sprite’s Render Layer to MG/middle and MG/back respectively (simply based on entering trigger colliders). As a result, a light source affects them when they’re right next to it in the same room – but not when they’re right next to it but with a wall-inbetween.

    2.2.2 Order in Layer

    Similarly to the background, each Sorting Layer in the middleground is in itself divided into multiple Orders in Layer (OiL). Here’s what we learned about using those.

    2.2.2.1 Keep OiL the same across SLs

    The “wall layers” are each structured very similarly to one another, meaning that one wall layer’s OiL values are (almost) exactly the same as all the other wall layers’ OiL values. The two movement layers also share the same OiL values. This makes memorizing OiL much easier and considerably speeds up placing sprites in the scene. For example, one type of sprite (e.g. foliage) has the same OiL across all wall layers on which it occurs. Make sure to set up external documentation for these general OiL rules (and your Render Order in general)!

    2.2.2.2 Reserve OiL

    In our project, some of the sprites can be interacted with (we call these “Interactables”) and show outlines once the player gets in range. The outlines need to be rendered behind the Interactable, but in front of the sprite behind it. This means that one OiL between the Interactable and the sprite right behind it needs to be reserved for the outline to prevent “fighting” for render order between the outline and the background sprite. For instance, if an Interactable (e.g. a cigarette vending machine) is on OiL 1 and the sprite behind it (e.g. a wall) is on OiL 0, the outline of the Interactable would have nowhere to go in-between the two. That’s why we have now reserved certain OiL for certain renderers: The OiL of any sprite must always be set to a multiple of ten (i.e. end in 0); outlines always render 1 OiL behind the sprite they belong to (i.e. end in 9). In our example, the cigarette vending machine could be on 10, the wall behind it on 0, and the vending machine outline on 9. Particle effects also often overlap with multiple sprites in uncontrolled ways, so we always place them on an OiL ending in 8 to avoid “fights”. Layers ending in 2 to 7 are still free for future special usage if the need arises.

    2.2.2.3 Dynamic OiL

    Most moving sprites in our game, like characters, update their Order in Layer every frame depending on their y position. This has to happen in order for them to render in the correct order relative to one another (on the same SL) where movement on the Y axis occurs, e.g. on stairs. In the example below, the player character renders in front of the NPCs above it, but behind the NPCs below it.

    Simply binding the OiL to an object’s y position – the further up it is on the screen, the lower its OiL – might be enough depending on your setup. However, you’ll likely run into a couple of problems:

    Problem 1: This might not work for special situations, e.g. complex set piece animations with lots of moving parts.
    Solution: That is why we recommend adding a boolean so you can turn this functionality off if you ever desire to set the Order in Layer manually instead.

    Problem 2: What about the rule that sprites can only be rendered on OiL that end in 0?
    Solution: To ensure that this is the case for moving sprites as well, just multiply the OiL by 10. (Concrete formula below.)

    Problem 3: Calculating the render order of sprites based on their relative position only works for sprites that rest on the floor.
    Solution: If your sprites can jump, float, or fly, things get a bit trickier. The short answer is: take the distance between a sprite and the ground platform it relates to into account when calculating the sprite’s OiL. This wasn’t a problem for us because we have no jumping mechanics, so I won’t go into more detail about it. However, this great blog post does!

    Finally, here’s our complete OiL calculation formula (located in the Update() method) followed by a quick explanation:

    movingSprite.sortingOrder = -1 * (Mathf.RoundToInt(transform.position.y * 100f) * 10);

    ElementReasoning
    movingSprite.sortingOrderThe sprite’s Order in Layer value.
    -1Sprites higher up are actually further in the back, i.e. the higher the y value, the lower we want the OiL to be.
    Mathf.RoundToInt()The OiL needs to be an integer. Use rounding rather than casting to int, which only chops off the decimals.
    transform.position.y * 100Take the sprite’s y position down to the second position after the decimal point before rounding. (bigger order of magnitude = more precise)
    * 10Make sure the sprite’s OiL always ends in 0 as established above.

    This is what it looks like in the game. Note that the OiL at the top changes as the player moves up and down.

    And that’s how we do it!

    I’ll talk more about properly setting up 2D assets, e.g. creating a parallax effect and how to handle pixel art, in future blog posts. If you found an error in this post or see room for improvement, I’ll be happy to update it. And if you found it useful, feel free to share it!

    Cheers,
    Julian

  • Challenges in Game Writing

    Challenges in Game Writing

    Compared to film and literature, games are still a fairly young medium. As we could see with films, it always takes some experimenting until new art forms find their very own means of expression. In games, this process is further complicated by the fact that, over the past few decades, technological innovations in hardware and software constantly renewed and changed the possibilities of game design.

    Since their inception, games have been looking for ways of telling thrilling, deep stories that can keep up with films, series or novels in terms of quality and that nevertheless make use of the most important medial specificity of games: their interactivity. Unfortunately, this great potential can also be a huge problem when it comes to writing interesting stories.

    In this blog article, I will outline some of the most important challenges and difficulties we have encountered so far when writing the story for our upcoming narrative game. I will get into some of the solutions we found in my upcoming posts, but I hope that today’s article will be helpful as well – it might point you to some aspects you could take a closer look at if you have the impression that your game’s story isn’t as exciting as it should be.

    Challenge 1: Dramaturgy

    One big challenge consists in designing a tight dramaturgy for your game. You want your audience to be glued to the screen, much like when they’re binge-watching a show. To keep the narrative pace up, films and novels usually work with loads of ellipses, meaning that they only show you the most interesting parts of the story and skip the rest.

    In the first Lord of the Rings movie for example, you don’t see the fellowship of the ring walk from Rivendell to Lothlórien for hours. Instead, you only get the scenes that are action-packed, relevant for character building, or otherwise important for the progression of the plot.

    Skipping less interesting parts isn’t as easy in games since the player often is in control of the protagonist. For example, let’s say our hero is in her apartment and finally decides to break up with her girlfriend. In a film, the next thing we would see is the protagonist standing at her partner’s porch. In a game, we have control over the hero, which at the very least means we need to make them walk over to their destination ourselves.

    To make such mundane things interesting, games often add challenges such as search for the coat, key and phone of our hero, and then navigating her through the city and finding a way across those building sites that block the road she usually takes. Unfortunately, this often tends to draw things out even more.

    Although it is important to give the player agency and different possibilities to go about something, interactive passages in narrative games can easily cause a drop in tension and give the audience a good opportunity to zone out. Telltale Games titles like The Wolf Among Us illustrate my point: They have a very tight dramaturgy and, in my opinion, are highly successful in creating tension. On the flipside, they have to reduce interactivity to a minimum in order to do so.

    Challenge 2: Character building

    In films, series and novels, the writers often put a lot of work into creatinginteresting, believable, and ambiguous characters. Public discussions around successful shows like Game of Thrones (up to a certain point) and Breaking Bad have demonstrated that audiences value these efforts. In games, we again face special challenges when it comes to character building.

    As mentioned above, the player is often in control of the protagonist. However, at the beginning of a game, you don’t know anything about your avatar, meaning that there is a big discrepancy in knowledge between you and the character you are supposed to identify with. Nevertheless, you often have some influence over the protagonist’s behavior and, in many games, may even have to make decisions for them. This can make you very aware of the divide between you and the protagonist and thus hinder identification and immersion.

    If you’re making a game that allows players to influence the course of the story, it can be very hard to create consistent, believable protagonists. Let’s say the player can decide how the protagonist behaves in certain situations. If the options between which the player can choose are very different from each other (e.g. they can either knock out a suspect or take a friendly approach), the choice is interesting and meaningful, but unless your protagonist suffers from multiple personality disorder, it’s hard to justify why both options represent plausible behavior.

    On the other hand, if the choices are basically one and the same (e.g. take a friendly approach or a very friendly approach), they are more consistent with your character’s personality, but they aren’t interesting for the player and won’t give them the impression that they really have an impact on the story.

    One more difficulty consists in finding appropriate ways to display your character’s personality. In novels, inner monologues and insights into the protagonist’s head allow the readers to learn how they think and feel. In visual media like films, authors mostly stick with the paradigm of “show, don’t tell”, meaning that they don’t tell us what the characters are like, but let them show their personality through their behavior.

    Games also belong to visual media, but depending on the art style, the range of what you can show is extremely limited. In films and series, the of the actors’ performances may draw a very nuanced picture of the characters. They are able to make use of body language, intonation, facial expressions, and gestures. In a game, you might not have the budget to use voice acting, and if you go with a low-res or abstract art style, integrating detailed facial expressions isn’t an option either.

    To sum it up, creating complex, nuanced, and consistent characters can be difficult due to the player’s influence and the limited means of expression.

    Challenge 3: Gameplay

    The third challenge concerns the potential interferences between gameplay and narrative. When you’re writing a story, you usually want to your audience to be completely immersed into the plot and, to a certain degree, forget about themselves and the real world they’re in. However, in an interactive medium, this absorption into fictional story worlds can be hard to achieve.

    This might sound counter-intuitive, but as soon as you have to actively do something and start to act, you necessarily become aware of yourself again. Of course it’s possible to completely immerse the player into the story world during interactive passages, but it is harder to achieve than in non-interactvie media. Please note that I’m only talking about immersion into the story. Immersion into the gameplay can of course be increased by interaction, but it often takes the focus away from the story.

    There’s a number of difficulties related to gameplay and interactivity. I will go into them in more detail in my upcoming posts, but I will highlight some that seem particularly important to me.

    First, in many games, it is possible for the player to fail: They can die in a fight, fall off a cliff or, as is the case in some older story-driven games, pick the wrong choice and thus cause the game to end. If you fail, you can usually retry from a nearby save point. However, the ability to try again makes failure narratively meaningless. You just do the part over and over again until you succeed; there aren’t any consequences whatsoever for the course of the story.

    As a consequence, when you have to pick your next choice for example, you’ll just try any one you haven’t tried before to see what brings you success, and it won’t be a tough decision for you. In addition, every time you see the “Game Over” screen, you’re reminded of the fact that you’re playing a game. In short, failure that temporarily ends the game often breaks immersion.

    Second, being stuck at a certain point can also have an extremely negative impact on your immersion. You might get annoyed because you can’t solve the puzzle. You might start doing random stuff hoping to find another clue. You might even tab out of the game and Google the solution. Whatever you do, you certainly don’t feel like you’re the protagonist facing a life-threatening situation anymore.

    Third, it can sometimes be hard to find a good balance between complexity and accessibility. Complex stories are often more interesting, realistic and subtle than those that follow a simpler formula. However, depending on your mechanics and your game design, it might be vital that the player have an idea of what is happening. In a detective game, they might even have to be able to reconstruct the course of events or to uncover hidden connections.

    This, in turn, can be difficult to achieve if you have a multi-layered story. If, for example, the player controls a detective and has to find out what happened at a crime scene, you have to make sure that there is only one plausible version of events. In reality, things usually are rarely that clear-cut, and the story is usually more authentic and credible if you try to mimic the complexity of real life to a certain degree.

    All in all, those are some of the most important challenges we have faced and still face working on our story-driven game. As promised, I will talk about some of the solutions we came up with in my upcoming posts. If you encountered different problems while working on your game’s story, tell me about them. And if you found my article useful, feel free to share!

    Cheers,
    Jasmin

  • Stairs in a 2D Side-Scroller

    Stairs in a 2D Side-Scroller

    Preface

    Movement on stairs has been the bane of my existence for a long time. I first added it to our old prototype in late 2017 and the code stayed more or less the same up until recently. It was barely good enough for our prototype, and it was never meant to stick around until release.

    However, precisely because it has produced so many bugs and highlighted so many pitfalls, I can now tell you what to look out for when designing your own system. I say “designing” because I will talk about game design a lot and address programming only conceptually rather than providing actual code snippets. Otherwise, this already lengthy write-up would definitely grow out of proportion.

    First, I want to quickly describe what the key features of our movement system are. If yours has completely different requirements, the solutions I am about to lay out may not work for you.

    1. The game is a 2D side scroller allowing the player to walk and sprint. It has no jumping or dashing, meaning that stairs can only be entered at the very top and bottom.
    2. Movement on stairs has its own custom animations rather than re-using the ones for regular horizontal walking (and sprinting).
    3. There are two types of stairs: frontal (vertical) and side (diagonal) stairs. The latter can descend (top left to bottom right) or ascend (bottom left to top right).
    4. All steps have the same size to fit the player’s animations. Stairs can be any length.
    5. Our player model’s collider (relevant to stairs movement) is around the thighs. However, this is not a requirement for most of this to work on a conceptual level.
    6. We don’t have any combat or other factors that might apply forces on the player while moving on stairs.
    7. The goal is to create intuitive, bug-resistant, and good-looking stairs movement.

    With all that out of the way, let’s iterate and solve problems as they pop up! We’ll start with side (i.e. diagonal) stairs; as you will see, most of the rules we’re about to set up apply to frontal (i.e. vertical) stairs as well.

    Part 1: Getting on the stairs

    The first thing we’re trying to do is get the player on the stairs. Let’s create the very basic iteration 1 of our stairs: When the player is about to pass by the stairs, they hit a collider (we’ll name “bypass check”) that switches them to stairs controls. Place another bypass check at the other end of the stairs and switch back to normal controls.

    The player collider is shown in green, the bypass check is blue.

    The first problem we’re going to solve might appear exotic at first, but it’s actually pretty important to think about early on: The player might not hit the collider at the right moment, especially at a low frame rate if your player movement speed is FPS-independent (which it definitely should be). With fewer frames per second, the walking distance between frames increases, and the higher it gets, the more the player will overshoot.

    At high FPS, the player will hit the collider just as they get in range:

    However, at low FPS, they they may hit the bypass check with just the back of their collider:

    This will cause the walk animation not to fit the stairs sprite. That is why, in iteration 2, we must pick one of two solutions for this:

    1. Simply teleport the player to the right position when starting (“entry point”) or ending (“exit point”) movement on stairs. Since the teleport distance is only bigger at low FPS, when the game is already choppy, the teleport won’t be noticeable.
    2. Have physics calculations happen between rendered frames. This will automatically solve this problem because the collision is always registered in the exact right moment. If you use Unity, FixedUpdate() will take care of this for you, which is called a fixed number of times per second regardless of visible FPS (by default 50 times, but you can change this value to your liking).

    Regardless of the solution you choose (the second one being preferable), I will keep using the terms “entry point” and “exit point” in the rest of this article, as those are conceptually revelant either way.

    The arrow illustrates a movement from one frame to the next.

    Now on to less obscure problems. What if the player wants to be able to walk past the stairs? So far, the player will always enter them once they touch one of its colliders.

    To solve this in iteration 3, let’s start by defining a different collider (called “entry range”) around the start of the stairs. Only when pressing up (at the bottom) or down (at the top) will the player start walking up or down the stairs. Moving left and right makes them walk past the entry points, and they continue with their regular horizontal movement.

    The problem now is that once the player starts pressing up or down inside the entry range, the player will start moving up exactly from where they are, not from the entry point. And even if they teleport to the entry point first (because we implemented that in iteration 2), the teleportation to the starting position looks way too obvious because the collider is so wide:

    To solve this in iteration 4, we make the character walk to the actual entry point while the player holds up or down inside the entry range. E.g. if the player is right of the entry point at the bottom of the stairs, holding up will cause the character to walk to the entry point first before they enter the stairs. For this to work, we need to add some conditional extra controls to our regular movement controls that only apply within entry range.

    Arrows in squares show which button the player is currently pressing.

    Now of course we got rid of the teleporting for good and, as a result, we’ve again lost control over where exactly the player enters the stairs, so the animation looks off. That is why, in iteration 5, we combine entry range and bypass check! However, the latter needs an upgrade now that the player can approach the stairs from both sides (as they can walk past them). The bypass check needs to dynamically switch to the opposite side of the stairs’ entry point, so the player is just in the right position when they hit it from either side.

    The combination ultimately works like this: If the player is within entry range and holds up/down, they move towards the entry point, and then when they hit the bypass check still holding down the button, they start moving on the stairs.

    Note: The bypass check always switches to the opposite side of the player so the two colliders touch at exactly the right time to initiate walking on stairs.

    Now the player can walk past the entry point of all our stairs. But what if the stairs are the only way to progress to the left or right? What if we sometimes want them the way they were in iteration 1, forcing the player to enter if they hold left or right towards the stairs? Depending on your level’s layout, some stairs may be the only way to progress in a direction while some others merely branch away from a path that continues on as well.

    That is way, in iteration 6, we distinguish between two types of stairs entry points (“bypassable” and “non-bypassable”). To that end, let’s add a boolean called “bypassable” that we can set individually for each end of each stairs object. If an entry point is not bypassable, the bypass check collider no longer dynamically switches sides because the entry point can only be approached from one side. Instead, the collider is always fixed to the opposite side of the approaching player.

    With this addition, we now have to make sure to account for every possible button or combination of buttons the player may use to express their intent to enter the different types of stairs entry points. Up (at the bottom) and down (at the top) already work on all stairs. However, when approaching non-bypassable stairs from the left, pressing right also expresses the intent to enter the stairs (and vice versa) because moving past them is not allowed. Now when hitting a bypass check, the player will be put on the stairs only if they are currently pressing one of the buttons specific to the current case.

    If the stairs in this example are bypassable, the player must hold up to enter them, or left/right to walk past them.

    The same goes on top of bypassable stairs: down to enter them, left/right to walk past

    If they are not bypassable, holding right and/or up will both be interpreted as the player intending to enter the stairs.

    The same goes on top of non-bypassable stairs. Pressing down and/or left will result in walking downstairs.

    This should feel nice already, but depending on the exact implementation of our controls, we may have just created a different set of problems by giving the player the ability of pressing so many different buttons near the stairs to walk towards them.

    To fix them in iteration 7, we need to define which buttons cancel each other out at the entry points of the different types of stairs and which ones must not add their movement speeds up with one another. We also need to set the animations accordingly, e.g. if two buttons cancel each other out (if the player is holding left and right, for example), the player model should not walk in place. To account for all the possible problems, it is important to distinguish between ascending stairs (bottom left to top right) and descending stairs (top left to bottom right). For instance, a player standing in the range of descending stairs might cause a “walk in place” animation by holding left (away from the stairs) and down (which, remember, counts as towards the stairs in this case). Or they might hold down (towards the stairs) and right (also towards the stairs) for twice the movement speed. We have to account for all different cases of all different button combinations on all types of stairs to make sure that doesn’t cause any problems. Maybe you have a clever system that does this for you already or you’re like me and you manually define a bunch of boolean combinations outside the actual movement logic.

    Holding left, holding down, and holding left + down should all yield the same result in this situation.

    Down + right and left + right both contradict each other. Holding these combinations causes the player to stop.

    I urge you not to be lazy about this step and to cover all your bases, both to prevent bugs and make the movement as intuitive as possible.

    Alright. Getting on side stairs works fine now. Are there special rules for frontal stairs?

    We actually only need to make a few small adjustments to add frontal stairs in iteration 8, as the basic logic works the same. In our game, we made it so only a pre-defined line on frontal stairs can actually be used rather than their whole surface. As a result, they have two clearly defined entry points, just like side stairs. This also means that the player can always walk past frontal stairs, i.e. both their top and bottom are bypassable, because the width of the stairs sprite is always wider than the entry range. In some cases, of course, the player may walk past frontal stairs and bump right into a wall which then stops them anyway. The rest (about getting on the stairs) works exactly the same. Even better, we don’t ever need to account for the player trying to get up frontal stairs by pressing left or right.

    Holding up within entry range causes the player to walk to the entry point and then start walking up the stairs.

    Holding down within entry range causes the player to walk to the entry point and then start walking down the stairs.

    Part 2: Walking on the stairs

    If you’ve made it this far, you seriously deserve a pat on the back. Entering stairs is the most complicated part of this system, I promise. Now let’s define movement on the different types of stairs.

    Depending on how your game is set up (e.g. if you use actual physics and gravity), going up diagonally or vertically might cause some problems, e.g. your player slides right down on their own once they enter stairs from the top. That is why, in iteration 9, we railroad the player along the stairs. Instead of physically resting on a collider, they move along an angled line with no physics involved. In fact, let’s cancel all forces on the player object when entering stairs and ignore any forces while on the stairs. In the case of our game, we luckily don’t need to account for combat or other factors that might apply forces to the player while they’re moving on stairs.

    But how can we ensure that the player always ends up at the top or bottom when moving up and down that angle? We could calculate the angle between top and bottom, but since our steps are always the same size to fit the animation, the angle of all our side stairs is automatically always the same regardless of length, and we can simply hard-code it.

    The angle is shown in blue. It’s not a collider, but exists merely in code.

    Alright, so how do our movement controls work on stairs? Let’s design them in iteration 10. The player expects both up, right, and up + right to walk them up ascending stairs (and the opposite for descending stairs). Make sure not to add up speeds.

    We also need to once again account for button combinations that cancel each other out. For example, on ascending stairs, left and down are the same, so both should cancel out up and right, which are also the same.

    What about controls on frontal stairs? Time for iteration 11!

    You might think that pressing up or down is all there is to it. However, forcing the player to hold up or down until they’re at the very end before they can go left or right feels counterintuitive and unpolished. It may also happen that the player is still 1 pixel beneath the top or above the bottom, wondering why pressing left or right doesn’t do anything. That is why we need to define the part of the stairs within 1 meter of each end as “exit range” of the top or bottom respectively. While the player is within exit range, pressing left or right will move them towards the exit point of the stairs. Then, once they reach the exit point, they leave the stairs and continue walking in the direction they’re holding down. Maybe you’ve already noticed that this works exactly like the entry range, which allows players to use additional buttons to walk towards the entry point (which we added all the way back in iterations 3 and 4). Again, we have to account for button combinations that should cancel each other out or would add up speeds.

    Exit range at the top and bottom of stairs shown in blue. You may use a collider for this, but we calculate it from the distance between player and nearest exit point.

    While the addition of an exit range adds a lot of polish, it also brings about its own set of problems that we’ll have to solve in iteration 12. For example, what if our frontal stairs are only 2m high or even smaller, putting the player within exit range of both top and bottom at the same time? Let’s set the exit range at, say, 20% of the stairs’ total length instead of hard-coding it to 1m each.

    Shorter stairs, shorter exit range

    This fixes our problem for short stairs, but it causes a new problem for long stairs, for which 20% is too big of an exit range. So in addition to the rules we set up in iteration 12, let’s also set a maximum exit range of 1m for each exit range in iteration 13.

    Part 3: Getting off the stairs

    We’re almost done! Now that getting on and moving along stairs works, getting off the stairs is actually fairly easy.

    Right now, our player just walks right past the top and bottom into infinity:

    In iteration 14, we set up colliders that allow the player to exit the stairs (i.e. go back to regular walking controls with physics re-applied) upon being triggered. We actually re-used the range colliders of top and bottom for this:

    The only problem with that is that the colliders are triggered too early, especially at the top, because of the player collider’s height. Let’s place the colliders at the top and bottom high and low enough respectively, so the player is inside them at the very end of their walk up or down the stairs.

    Alright, but: The player is still inside that collider while they’re still in the process of entering the stairs, so can’t they turn back around and walk right through it without triggering it again, allowing them to walk past the exit point? Why, yes! In iteration 15, we solve this the same way we did for entering the stairs: We define a number of buttons that expresses the intent to leave the stairs for each case (descending/ascending/frontal), same as in iteration 6. When the player presses one of those while inside the exit range, they leave the stairs again.

    In iteration 16, we again account for low FPS which may cause the player to overshoot the exit point. If you already use FPS-independent physics calculations as mentioned in iteration 2, that’s all you need. If not, let’s teleport the player to the exact exit point, the same way we teleported them to the entry point:

    And that’s it! In only 16 simple iterations, we’ve reached the goal of creating intuitive, bug-resistant, and good-looking stairs movement.

    Of course we realize that this type of movement system isn’t at all complicated or sophisticated compared to some AI-based 3D multi-terrain movement system a programming super brain might be able to cook up nowadays. However, it works well for us and should be reasonably easy to implement into any similar 2D side-scroller. In case you’re thinking that any aspects of it could be simplified, solidified, or anything-else-ified, feel free to let us know. We’ll gladly refine both our code and this guide to better help other developers in the future.

    We hope it helped or entertained you or, at the very least, showed that a seemingly innocuous mechanic can be pretty complicated to implement sometimes.

    Julian